The popups in WebViewer UI are small floating menus.
In WebViewer UI, there are 4 types of popups:
- context menu popup; appears on right click of a blank space

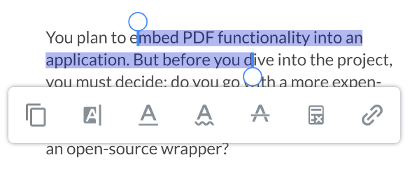
- text popup; appears on highlight of a text when using select tool
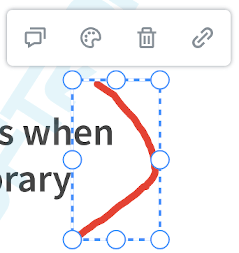
- annotation popup; appears on selection of annotation(s)
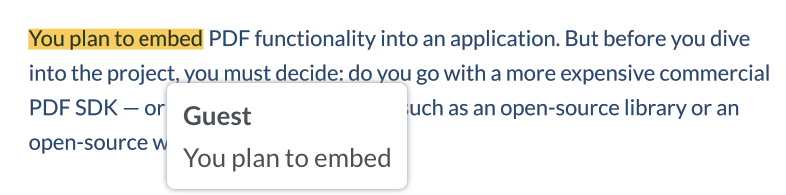
- content overlay popup; appears on hover of annotation(s)
There are a number of ways you may want to customize Popups. To name a few:
The WebViewer UI provides APIS to easily handle each of these cases and more.
Get items
The unique identifier of the items in the popup can be retrieved using the getItems API.
It returns an array of objects where each object contains a key that denotes the dataElement.
Adding items
Adding items can be done using the add API.
The type of items to add can be found in the header item API.
Add new items at beginning of the popup
To add new items at beginning of the popup, do not provide a second parameter to the add function.
WebViewer(...)
  .then(function(instance) {
    instance.UI.contextMenuPopup.add({
      type: 'actionButton',
      label: 'some-label',
      onClick: () => console.log('clicked'),
    });
  });
Add new items at a specific index of the popup
There are 2 ways to do this.
Option one:
- provide a valid dataElement string as a second parameter. This will insert the new item(s) after the specified data element.
Option two:
- Get the list of data elements in the popup using the getItems API
- Call the add API and use the index from the list retrieved step 1 as the second parameter
WebViewer(...)
  .then(function(instance) {
    const contextMenuItems = instance.UI.contextMenuPopup.getItems();
    // insert the new item after the 6th element
    instance.UI.contextMenuPopup.add({
      type: 'actionButton',
      label: 'some-label',
      onClick: () => console.log('clicked'),
    },
    contextMenuItems[5].dataElement);
  });
Modifying items
Existing items can be modified using updateElements.
The items in the popup can be replaced using update.
Update existing elements' properties
WebViewer(...)
  .then(function(instance) {
    // Updating existing sticky tool button in context menu popup with new label and new on click handler
    instance.UI.updateElement(
      "stickyToolButton",
      {
        label: 'new-label',
        onClick: () => console.log('clicked')
      }
    );
  });
Replace existing elements
WebViewer(...)
  .then(function(instance) {
    // replace existing items with a new array of items
    instance.UI.contextMenuPopup.update([
      {
        type: 'actionButton',
        label: '1',
        onClick: () => console.log('clicked'),
      },
      {
        type: 'actionButton',
        label: '2',
        onClick: () => console.log('clicked'),
      },
    ]);
  });
Update ordering of elements in the popup
This can be done by:
- Get the list of data elements in the popup using the getItems API
- Modify ordering of the elements in the list retrieved from step 1.
- call update
WebViewer(...)
  .then(function(instance) {
    const contextMenuItems = instance.UI.contextMenuPopup.getItems();
    const newArray = contextMenuItems.reverse();
    instance.UI.contextMenuPopup.update(newArray);
  });
Deleting items
Items in the popup can be deleted using the using disableElements.
Adds a custom overlay to annotation on hover
WebViewer(...)
  .then(function(instance) {
    instance.UI.setAnnotationContentOverlayHandler(annotation => {
      const div = document.createElement('div');
      div.appendChild(document.createTextNode(`Created by: ${annotation.Author}`));
      div.appendChild(document.createElement('br'));
      div.appendChild(document.createTextNode(`Created on ${annotation.DateCreated}`));
      return div;
    });
  });